Wednesday, June 2, 2010

♫Hey Food♫


Yes, we're still blogging. I'd blame the summertime for my lack of updating, but the weather's been downright dreary. It's just been a busy week. Nay, month!

Another move; another new kitchen!

I'd love to call this kitchen pseudo for the sake of blog integrity, but it's actually quite beautiful. We can only call it pseudo this week because it's full of unpacked boxes.

That being said? Easy peasy recipe for the night.
41/2 cups (450 g) confectioners' sugar, sifted
8-9 tbsp (120-135 ml) sweetened condensed milk
few drops of green extract or essence
few drops of green food colouring
6oz (150 g) dark cocholate

and 98% sugar.

After a solid 10 minutes of kneading the mixture, I swore to myself to designate someone else to do any kneading that's ever needed in the future. Bliss took over for the rolling part!

When we dipped the cookies in chocolate, Bliss couldn't help but recognize a fab four among us.


If I remember correctly..
[l-r] Ringo, John, Paul, George

And now, for the finale, click here to hear listen to Sesame Street's cover of "Hey Jude".
It's very fitting.

Friday, May 7, 2010

Summer Snowballs in Spring!

Well this one takes me back...we first made Summer Snowballs months and months ago. It's a really versatile recipe; you can make it as simple as you're in the mood for.

When we made it in the winter months, it was a derrivative of this recipe:

INGREDIENTS

2 cups (500 mL) sweetened shredded coconut
2 cups (500 mL) Vanilla ice cream
1 banana
1/2 cup various dessert toppings


INSTRUCTIONS

Preheat oven to 400°F (200°C).
Place coconut on rimmed baking sheet. Bake in centre of oven for 5 to 6 minutes or until golden and fragrant. Set aside to cool.
Cover another rimmed baking sheet with plastic wrap. Scoop ice cream onto baking sheet in four even scoops, spacing scoops out without touching one another. Place baking sheet in freezer for 3 hours.
Roll frozen ice cream balls in toasted coconut to coat evenly. Slice banana thinly crosswise; top with your choice of dessert toppings.
Place coconut ice cream balls onto dessert plates.

***

Of course, when there's children and ice cream around, the patience level is slim to none.


However, the teamwork levels were through the roof.


The recipe intructions quickly became:
*Scoop ice cream.
*Ask everyone what toppings they want.
*Serve immediately.


Mmm, with a high emphasis on the serve immediately part!

Saturday, May 1, 2010

Bliss is in the Kitchen ♫


That spring air just makes me want to..y'know..not sit around and blog, so I'm ever later than usual.

But speaking of Spring, what better way to welcome it than with smoothies.
This was really special to make, because for the first time, Bliss made a recipe all on her own!

Well, I suppose I awkwardly peeled the mango, but besides that - really proud of Bliss!


And really PLEASED with the results.


Ingredients
1 cup french vanilla/raspberry yogurt (an impromptu additive!)
1 cup pineapple/kiwi juice
1/2 banana, sliced
1 mango - peeled, seeded and chopped
1/2 cup 2% milk (I think? Whatever was in the fridge)
2 tablespoons coconut milk

Since we did toy with the original instructions, I deem this a Blissy Original. When she names it, I will tell you what its name is.

I lament, bloggers. I cannot blog the rest. There is far too much sunshine to be absorbed.

Plenty of springtime cookin' to be had though, I shan't neglect this blog for long.

Friday, April 23, 2010

The Blog of Adventures Past.

Whoops! I took a night off from cooking.
When the weather is this beachy-keen (aaaahaha, you know I know you see what I did there. Oh, what to do with all this wit), you do not coop these boys up.

As a replacement, I wanted to share with you a a few favourites collecting e-dust.

First, my favourite piece of furniture in pseudo kitchen.
Behold.

Stunning, no? This microwave stand makes me smile, though I'm not sure if it has retired yet or not by now.

Next, my favourite little blondie that wanders the pseudo kitchen.
Sooo unbelievably sweet, my boy.

Perhaps one of the most important pictures of them all, my favourite picture of Cookie Monster:


And last but not least, my favourite completely random picture I found on Michelle's camera.


Tuesday, April 20, 2010

A Favorite From the Past + Cheese Scones from a B-b-b-boy!

We played with a recipe we made sometime last month. The coconut chicken chili. It's officially renamed coconut-shrimp-tofu-chili-sans-beans.

..Ok, ok, I'll work on the name.

We changed it up just a wee bit. To refresh your memory, here's the recipe (changes marked in green)


100g cubed extra firm tofu
3 cups prawns [Pretty sure we used more. T'was delightfully shrimpy. 3/4 of the bag, I think?]
1 large onion, chopped
1-1/2 teaspoons chili powder
1/4 teaspoon cayenne pepper[skipped]
1 Tablespoon olive oil
1 Tablespoon all-purpose flour
1 14 oz. can unsweetened coconut milk
1 Tablespoon peanut butter
3 medium carrots, shredded with a box grater on the biggest holes [whoops! Skipped]
5 cloves garlic, minced [used a bit less, after the third heaping spoonful, spectators appeared nervous]
1 yellow pepper, Princess Sparklecaked.

Serve over hot cooked jasmine rice [used pasta this time!]

Summer is pro with Princess Sparklecake.
Her new hair clip is pro too, hey? .... :)

...I'll show you what that's for after the cooking's done.

What's next!? Cheesy scones!
We got this recipe from a friend of Jen's, and it was a lot of fun to make!


OOEY GOOEY fun, to be precise.


Ingrediants: [sic...lol]

-2 cups of Flour

-2 tbsp of White Sugar

-1 tbsp Baking Powder

-1/4 cup of Shortening

-2 eggs

-1/2 cup of Milk

-1 cup of grated Cheese, plus abit extra for top.

Steps:

Preheat Oven to 450.

1) Combine dry ingrediants in bowl. (Flour, Sugar, Baking Powder). Mix

2) Add in Shortening. Mix again XD.

3) Make a well in center of dough mixture, Add Eggs and Milk. Mix

4) Add cup of grated cheese to flour mixture. Mix briefly.

5) Pat out dough on floured surface with hands.

6) Cut into either wedges with a knife, or biscuits using top of a glass.

8) Sprinkle abit of cheese on top of cut scones/biscuits, to taste.

7) Bake for 15 minutes at 450.

My favorite part was making the "well"; a new term pour moi.


Well, second favorite. I think I speak for all of us when I say eating was the best part.

Delish!

...and I have not forgotten that I owe an explanation for the tinfoil hair decoration, so I will be back in an hour.

***

For the final reveal...here's what the tin foil was hiding:

Pink-and-purple-haired-little-monkeys!


Wednesday, April 14, 2010

Veggie Strogg and other adventures


I'm at risk for being an entire week late with this blog, so it must be done TONIGHT!! It seems that the more lovely the weather, the less likely I am to spend an hour hanging out with my keyboard and some e-recipes :)

Raisa's choice again for (last) Thursday. Well, sort of. Raisa chose the country, and I chose the recipe.

What country?

Russia!

Since I am a pasta nut, I chose stroganoff. Since Summer's a vegetarian...we pretty much made up a new recipe.


As long as it's pasta, says I.

INGREDIENTS
*1 pound of magical Yve's veggie ground
*freshly ground black pepper
*2 to 3 tablespoons peanut oil (hah! We used olive oil. I'm not running out for a bottle of peanut oil because "Company's Coming" tells me I need a tablespoon of it!)
*1 inner packet of onion soup and dip mix
*1/2 cup water + an additional 1 1/2 cups water as needed
*10 3/4 oz. can condensed cream of mushroom soup
*8 oz. uncooked egg noodles (nyeh, we just used the pasta in pseudo kitchen's pantry)
*1 teaspoon olive oil for cooking noodles
*1 cup sour cream

DIRECTIONS

Well, if you're Trina...your directions are to sit around and watch everyone else do the work, because I was pretty unplugged that night.

For everyone else involved:


*Get yon skillet; add olive oil, cook up the magical veggie ground.
*add the packet of onion soup/dip mix, with about a cup of water and the can of mushroom soup mix. Cook on low heat for 10-15 minutes, stirring occassionally
*cook noodles while the sauce is doing it's thing. If the sauce is looking too thick, add water.
*Ask Trina why this recipe is so easy, forcing her to check the recipe again and holler "Whoops! It needs sour cream! Add one cup of sour cream!"
*Do as Trina says. >:)
*Stir it up and pour your veggie stroggy sauce over the noodles.


I looooved it. That veggie ground is magical!

--and I'll be back to edit this in an hour to explain the Russian stuffed egg on the plate.

***
Update:

Ok, it's an hour later.

Farshirovannye Yaytsa is (as far as I understand) Russian for "Stuffed Eggs".

While I did provide the recipe, Jen did the prep work! Well...ok, she did ALL the work.


INGREDIENTS!

6 hardboiled egg (I think we used 8? Jen? Was it 8?)
3 tablespoons mayonnaise
1 tablespoon dry mustard
3 small pickles, finely chopped

"FINELY CHOPPED"???

That sounds like a job for Princess Sparklecake.

She was absent this evening. She was hanging out at Le Spa D'Cupboard @ Home.

Admiral Megatron has been stood up!? Admiral Megatron is displeased.


Life went on, much to his dismay.

DIRECTIONS:
*Peel the eggs and cut inhalf. Carefully remove the yolks and crush well.
*Mix with mayonaisse, mustard, pickles and season with salt and pepper.
*Using a spoon, fill the egg halves with the mixture
*chill until ready to serve.


Since Jen was in charge, she thought it could use some paprika. She was right.

..and if you need proof of the fact that she was right...observe the scraping of the dishes, and the interested onlookers:


Tuesday, April 6, 2010

Raisa's Wrap Recipe For the Win!

Mmm, I love alliterations as much as I love these wraps!


Dem's d'ingredients!
(We used Yve's veggie ground instead of beef. Raisa couldn't tell! Wee!)

Dem's d'happy boys waiting for supper, aaaaannd...


Dem's d'newest addition to pseudo kitchen! A gorgeously relevant quote! Beautiful!

This evening I learned how to manually mince ginger and garlic! ...who'd have thunk we'd ever run out of pre-minced garlic?!

Also, who'd have thunk we'd ever survive without Princess Sparklecake?

...somehow, it happened. We survived!


A colourful saute!

Instructions:

*Cut across lettuce a quarter inch from core.

Fill sink with cold water. Push lettuce up n' down until leaves separate. Gently pull the leaves away from the core one leaf @ a time. Remove leaves from water and dry on paper towels.

*In a heavy skillet, stir-fry beef (we used veggie ground and it was SUPER delish; Raisa couldn't tell the difference!) garlic and ginger for 2m.

*Add peppers, carrot and onion, stir-fry until beef (sic) is cooked and veggies are tender

*Remove from heat and add steam fried noodles; cook briefly (make sure noodles remain crunchy)

*Transfer mixture to the lettuce "wrap" that was earlier prepped. Wrap it up and enjoy!

WAIT WAIT WAIT WAIT!!

Don't forget this sauce before you wrap it up:


Ok, now you can wrap it up.

See what I did there? Wrap it up?
See how hilarious I am with the double entendres??

...you know I'm funny.


Dem's d'final result. Seriously delicious. Everyone had seconds!

...Everyone except this sweet potato. I'm confident that that's only because she's still getting used to us :)


Monday, March 29, 2010

Boys are SO distracting.

Oi, I'm late! I'm blogging for last Thursday.
It's fine though; we were making Bliss' birthday cake, and photographing it before her birthday is just bad luck, says I.

So we had a new cooking buddy come over this time.

A...b-b-boy!

No, not that boy. But he was there, too.

Just a friend of Summer's. I think I'll call him D-hizzle.
I think that's what Snoop Dogg would want.

Here's what we were dealing with: Victoria Sponge Cake from a mildly frustrating British cookbook:


You’ll need:
For the cake—
- 1 cup (2 sticks) unsalted butter, very soft
- ¾ cup sugar
- 1 tsp vanilla extract
- 4 large eggs
- 1⅓ cups self-rising cake flour
- 2 tbsp cornstarch
- 1 tsp baking powder (if using processor method)
- 4 tbsp milk
- 2 8×2 inch cake pans (buttered and lined with parchment or wax paper)

For the filling—
- 4 tbsp raspberry jam (recipe below)
- 1 cup raspberries
- 1 cup heavy cream

----
First issue: cake had to stay good for...like, 3 days. So Summer decided to replace the raspberries with gummie bears.

Second issue: we had no gummie bears.

So we took a little walk to the corner store. Have you seen this girl's keychain?! No, of course you haven't.

It's more of a tribal headdress than a keychain though.


No complaints!


Ran into this guy, too.
Eeeeeuck.


On the walk home D-hizzle taught me a terrible Sesame Street parody, and I'll never be the same again! Elmo, how could yooou!

Just kidding, D!

The nice thing about this recipe is that yes, a blender does easily replace a food processor. There wasn't much to do! Trow everything into our "food processor", blend, add eggs, blend, graaaadually add milk, blend.


So what took us 2 hours?!
I said it before, and I'll say it again, boys are so distracting.

Wouldn't you agree, Princess Sparklecake?


She's so radiant.
And wow, I need new sparkle tubes.

Ok, so after wrenching Summer and D-hizzle off the computer every 7 minutes or so, we got the boy crumbling cauliflower for us!


No, they didn't go in the cake.
They went in some dish that kind of tasted like nothing, so never mind it.

But yes, I am resolved. While boys may be distracting, they can also be quite helpful :)


See?! Look how much work we got done!

Nothing left to do but sit back and wonder who gave Bliss permission to turn 9.
I know I didn't.

It happened anyway!

Wednesday, March 24, 2010

Pasta Primavera and Blissful Fairy Cakes!

Yikes, it's been too long. We missed Thursday night because no one was feeling all that great.

Monday was a must, however. Birthday season has begun, and we have precious little time to prepare!

That's right!

Bliss will be 9 soon, and there is baking to be done!

First things first, though: supper!

This is a really hard-to-mess-up recipe.
As a result, we did not mess up. Phew!

Just run-of-the-mill linguine noodles for the pasta.
(...yes, the gluten-free diet is quickly fading into a thing of the past.)

And, if I can remember everything here in the primavera:


*2 tbsp olive oil
*handful of cherry tomatoes, halved
*4 stalks asparagus, chopped
*2 tablespoons minced garlic
*1/2 cup broccoli florets
*4 or 5 large mushrooms, chopped into really big chunks so the people that don't like mushrooms can pick them out
*half a red bell pepper, prepared with magical mixing machine.

WHOA, WAIT.

Have we ever posted a picture of this thing???
This thing is as integral as Admiral Megatron!
Have we honestly never posted a picture of her?

Aww, there she is.

Isn't she beautiful?

It's not my place to name her, as she belongs to Michelle, but...I'm pretty sure I want to name her Princess Sparklecake!
We'll put it to a vote shortly.

I'll have to get back to you on the sauce ingredients; all I remember is that it contains whipping cream and cheese.

...and that the final result was deliciousness :)


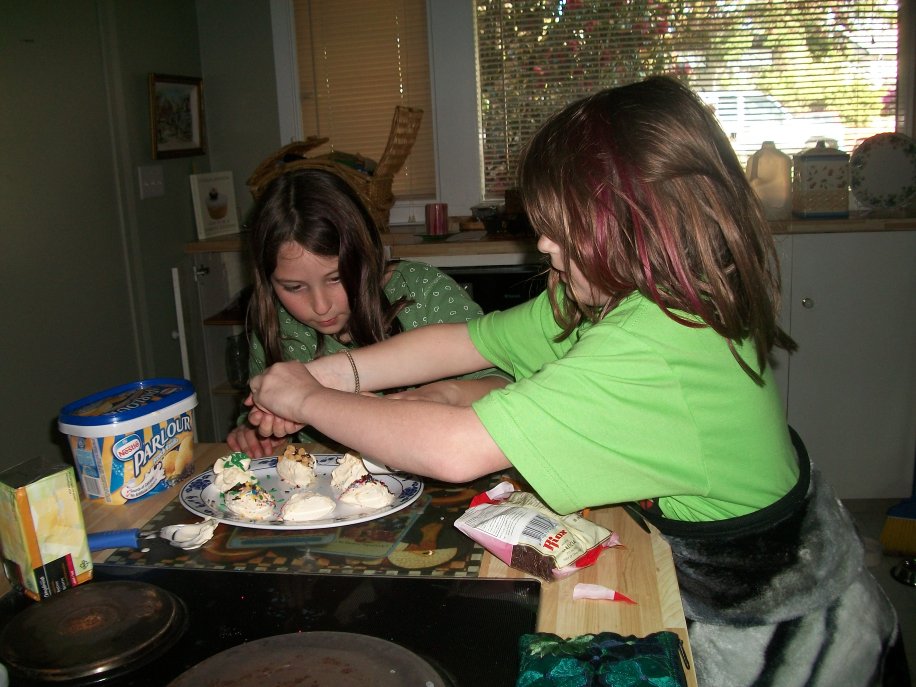
After feeding the almost-birthday-girl, she went off to practice while Summer and I got to work on practicing fairy cakes; birthday style!


Ingredients:
*half cup unsalted butter, softened
*half cup superfine sugar (uh..we used icing sugar; internet instructed us to double the amount, and that that'd be AOK)
*2 large eggs
*three-quarters cup self-rising cake flour (We uh...used regular flour. I don't recommentd it, even though the result was successful!)
*half teaspoon vanilla extract
*2-3 tablespoons milk
*12-cup muffin pan lined with 12 paper baking cups

Directions:

Put all the ingredients except for the milk in the food processor (we used a blender!) and then blitz till smooth. Pulse while adding milk down the funnel (we just poured it in slowly!), to make for a soft, dropping consistency. I know it looks as if you'll never make this scant mixture fit 12 cupcake cups, but you will, so just spoon and scrape the stuff in, trying to fill each cup equally. Put in the oven and bake for 15-20 minutes or until the fairy cakes are cooked and golden on top. As soon as bearable, take the fairy cakes in their cases out of the tin and let cool on a wire rack.

--

After that, there's nothing else left to do besides adding your personal touch to it.


whether it be pretty...


...or a wee bit silly!


We had a really fun night :)


Tuesday, March 16, 2010

Cheese Lasagna ala Summer


Ahh, Spring Break has come to an end (for..half of us, at least). We were all a little bagged, so it's a good thing Bliss chose an easy recipe for us this time: cheese lasagna! Yep, the most basic of basic of all the lasagnas.

Again, we had some additional guests!

This is Sabrina (@SabrinaaK, yes I accidentally called her Sabs last night, a handful of times).

This is the look she gave us when she realized that these chefs won't give her people food. Poor girl!

We started the prep work while Bliss got creative with her after school snack

The super duper easy recipe:


Ingredients

16 ounces uncooked lasagna noodles
1 (26 ounce) can spaghetti sauce
1 pound cottage cheese
8 ounces shredded mozzarella cheese
8 ounces shredded Cheddar cheese
1 cup grated Parmesan cheese
Directions

Preheat oven to 375 degrees F (190 degrees C).
Bring a large pot of lightly salted water to a boil. Add pasta and cook for 8 to 10 minutes or until al dente; drain.
In a blender or with an electric mixer, blend tomato sauce and cottage cheese together until smooth. Spoon a little of the sauce mixture in the bottom of a 9x13 baking dish. Place a layer of cooked noodles over the sauce, and sprinkle a portion of the mozzarella, the cheddar and the parmesan over the noodles. Repeat layering of sauce, noodles and cheese; finish with a cheese layer.
Bake in preheated oven 30 to 45 minutes, until cheese is bubbly and golden.

We grated the cheese in tandem, as it was faster and funner that way


I guess I grated mine wrong. I require heavy supervision :|

It got the job done! Sauce, noodles, cheese, sauce, noodles, cheese, sauce, noodles, cheese, and then...the most exciting part...


sauce, noodles, cheese!!!

et voila.

We ate in shifts last night, haha. Bliss n' Michelle had practice right as the food was cooling. While Eldon is a lovely (albeit picky) food critic, we convinced Farid to test out our recipe.

Round one: 100% approval rating. I loved it, Summer loved it, Farid went for seconds, and...

Eldon, what did you think?


Like I said: 100% approval rating.

Round 2, the rest of the posse came home, and enjoyed as well!
Round 3, Grandpa stopped by and...alls well that ends well!

Here's the garlic bread recipe. It was super garlicy, but since most of us are either getting sick or getting over being sick, it was AOK.


(I cut the recipe in half; Eldon and Summer gnawed at the other half of the loaf until it was widdled down to bread-nubs)

Ingredients

3 bulbs garlic
2 tablespoons olive oil
1 (1 pound) loaf Italian bread
1/2 cup butter
1 tablespoon chopped fresh parsley (optional)
2 tablespoons grated Parmesan cheese (optional)
Directions

Preheat the oven to 350 degrees F (175 degrees C). Slice the tops off of the garlic bulbs so that the tip of each clove is exposed. Place the bulbs on a baking sheet, and drizzle with olive oil. Bake for 30 minutes, or until garlic is soft.
Set the oven to broil. Slice the loaf of bread in half horizontally, and place cut side up on a baking sheet.
Squeeze the cloves of garlic from their skins into a medium bowl. Stir in the butter, parsley, and Parmesan cheese until well blended. Spread onto the cut sides of the bread.
Broil for about 5 minutes, until toasted.


Even this guy couldn't have done it better himself :)